
Ideal Distance Setup for Short Throw Projectors in Apartments
Short throw projectors are becoming increasingly popular for apartment living. Limited space, low ceilings, and compact rooms often make traditional projectors impractical. Short throw projectors, however, can deliver large, vibrant images from just a few feet away, creating an immersive viewing experience similar to an ultra wide monitor. To get the best performance, understanding the ideal short throw projector distance and projection throw distance is essential. Knowing how far the projector should be from the screen ensures sharp images, proper alignment, and a cinematic experience even in smaller spaces.
Why Distance Matters in Apartments
In apartments, space is often limited, which makes projector placement challenging. Placing the projector too close to the screen can result in images that are too small or distorted, while placing it too far can reduce brightness and image quality. Calculating the correct short throw projector distance is critical to balance image size, clarity, and room layout.
Apartments often have furniture, windows, and shared walls that can impact placement. Proper planning allows for a setup that maximizes the projector’s capabilities while avoiding common issues such as glare, shadows, and reflections.
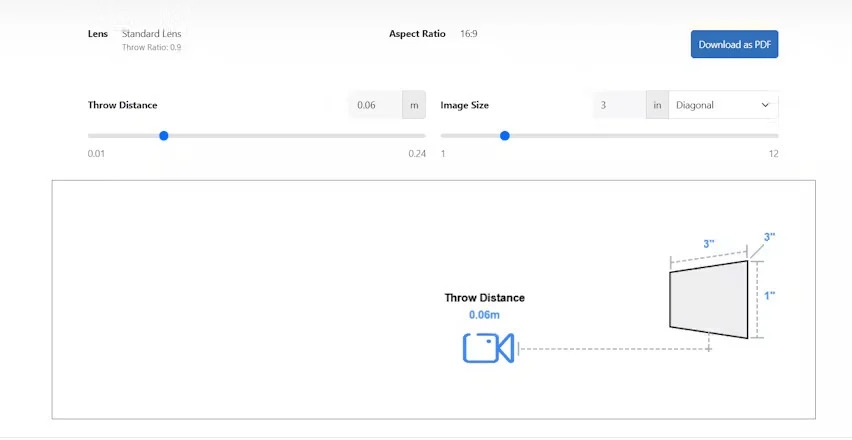
Understanding Projection Throw Distance
Projection throw distance refers to the space between the projector lens and the screen. Short throw projectors have low throw ratios, usually between 0.4:1 and 1.0:1, which allow them to produce large images from a short distance.
For example, a projector with a throw ratio of 0.5:1 can project a 10 foot wide image from only 5 feet away. Understanding the throw ratio and calculating projection throw distance is the first step in determining how far the projector should be from the screen for optimal results.
Step 1. Measure Your Apartment Space
Start by measuring the room where you plan to install the projector. Note the distance from the wall or screen to potential projector positions. Measure the height of the ceiling to ensure that the projector can be placed without obstruction and that the image will fit the wall or screen area.
Also measure the intended screen size. Short throw projectors can create large images even in small apartments, making them ideal for spaces where a traditional projector would not fit comfortably.
Step 2. Calculate the Short Throw Projector Distance
Once you have the screen width and the projector’s throw ratio, multiply the width by the throw ratio to determine the short throw projector distance.
For instance, if your screen is 8 feet wide and the projector has a throw ratio of 0.5:1, the projector should be placed 4 feet from the screen. This calculation ensures the image fills the screen without distortion and aligns properly with the wall or screen surface.
Step 3. Determine the Optimal Height
The height at which the projector is placed affects image alignment and clarity. In apartments with lower ceilings, consider placing the projector on a media console or a shelf rather than ceiling mounting. The lens should be level with the bottom of the screen or slightly below, depending on the projector’s lens shift capability.
Proper height placement prevents keystone distortion, where the image becomes trapezoidal instead of rectangular. Adjusting height correctly allows the image to be evenly lit and maintains clarity across the entire screen.
Step 4. Placement Options in Apartments
In apartments, flexible placement options are important. Short throw projectors can be placed on tables, shelves, or mounted on walls or ceilings. Tabletop placement offers convenience and mobility, while wall or ceiling mounting provides a permanent setup with minimal interference from furniture or foot traffic.
Ensure adequate ventilation around the projector, especially in compact apartment rooms, to prevent overheating. Proper placement also reduces the risk of accidental bumps or movement that can disrupt the image.
Step 5. Managing Ambient Light
Apartments often have windows and multiple light sources. Ambient light can wash out the projected image if not managed properly. Use curtains, blinds, or shades to control sunlight, and consider dimmable lights for evening viewing.
Ambient light affects the perceived brightness and clarity, which can influence short throw projector distance decisions. In brighter rooms, placing the projector slightly closer to the screen may enhance visibility without changing image size.
Step 6. Connect Devices and Test
Once the projector is positioned, connect your devices such as streaming boxes, gaming consoles, or laptops. Display a test pattern or grid to check alignment, focus, and image size.
Short throw projectors in apartments allow you to enjoy a cinematic experience without a dedicated home theater room. Proper setup ensures the image is immersive and visually engaging, comparable to an ultra wide monitor.
Step 7. Fine Tune Focus and Image Settings
Adjust focus to achieve a sharp image across the screen. Many projectors offer lens shift, zoom, and digital keystone correction to refine the image. Use these features carefully to avoid degrading picture quality.
Adjust brightness, contrast, and color settings to suit your apartment environment. Test the image from multiple seating positions to ensure all viewers have a clear and consistent view.
Recommended Distance Guidelines for Apartments
-
Small apartments (rooms under 12 feet): Place the projector 3 to 5 feet from the screen.
-
Medium apartments (rooms 12 to 18 feet): Place the projector 5 to 7 feet from the screen.
-
Larger apartments (rooms over 18 feet): Place the projector 6 to 9 feet from the screen depending on the throw ratio and desired image size.
These distances provide a starting point. Always calculate based on your specific projector’s throw ratio and screen dimensions for optimal results.
Common Mistakes to Avoid
-
Placing the projector too far
This can reduce brightness and clarity, especially in rooms with ambient light. -
Incorrect height placement
Too high or low placement causes distortion and uneven brightness. -
Ignoring ambient light
Bright windows or lights can wash out the image. -
Overreliance on digital corrections
Physical placement and alignment are more effective than digital keystone adjustments alone.
Conclusion
Setting up the ideal short throw projector distance in apartments is key to achieving high-quality images. By understanding short throw projector distance, projection throw distance, and how far the projector should be from the screen, you can ensure sharp, bright, and immersive visuals.
Even in small spaces, proper placement, height adjustment, and ambient light management allow short throw projectors to deliver a cinematic experience similar to an ultra wide monitor. With careful planning, your apartment can be transformed into a comfortable and engaging home theater for movies, shows, and gaming.
Read more: https://www.neymarfootballforum.com/read-blog/17365
- Questions and Answers
- Opinion
- Motivational and Inspiring Story
- Technology
- Live and Let live
- Focus
- Geopolitics
- Military-Arms/Equipment
- Segurança
- Economy
- Beasts of Nations
- Machine Tools-The “Mother Industry”
- Art
- Causes
- Crafts
- Dance
- Drinks
- Film/Movie
- Fitness
- Food
- Jogos
- Gardening
- Health
- Início
- Literature
- Music
- Networking
- Outro
- Party
- Religion
- Shopping
- Sports
- Theater
- Health and Wellness
- News
- Culture