
A home theater or professional projection setup is only as effective as the placement and alignment of your projector. One of the most critical factors to consider is the Throw Ratio, which determines how far the projector must be from the screen to achieve a specific image size. Miscalculating throw distance can lead to images that are too small, too large, or distorted, compromising the overall viewing experience.
Understanding how to calculate throw ratio is essential for achieving the Perfect Projector Setup. In this guide, we will explain the concept of throw ratio, provide step-by-step calculation methods, and discuss tips for optimal projector placement in any room.
1. Understanding Throw Ratio
Throw ratio is a fundamental specification of a projector. It defines the relationship between the distance from the projector to the screen (throw distance) and the width of the projected image.
The formula is:
Throw Ratio = Throw Distance ÷ Image Width
Where:
-
Throw Distance is the distance from the projector lens to the screen.
-
Image Width is the horizontal width of the projected image.
For example, a projector with a throw ratio of 1.5 and a desired image width of 8 feet would need to be placed 12 feet from the screen (1.5 × 8 = 12).
Understanding throw ratio allows you to plan projector placement accurately and avoid issues like oversized or undersized images.
2. Types of Throw Ratios
Projectors come with different throw ratios suited for various room sizes and applications:
-
Standard Throw: Ratios around 1.5 to 2.0. Suitable for medium to large rooms with sufficient distance between the projector and screen.
-
Short Throw: Ratios less than 1.0. Ideal for small rooms where the projector is placed close to the screen.
-
Ultra Short Throw: Ratios less than 0.5. Allows placement just inches from the screen, perfect for compact spaces or interactive displays.
Choosing the right throw ratio ensures that the projector fits within your room’s constraints while delivering the desired image size.
3. Measuring Your Room
Before calculating throw ratio, measure your room and determine the optimal image size:
-
Screen Width: Measure the desired width of the screen in feet or meters.
-
Throw Distance: Measure the available distance from the projector mount to the screen.
-
Ceiling Height: Ensure the projector can be mounted without obstructing viewers or furniture.
Accurate room measurements are the foundation for calculating the correct throw ratio and planning the Perfect Projector Setup.
4. Calculating Throw Distance
Once you know the image width and throw ratio of your projector, calculating the required throw distance is straightforward:
Throw Distance = Throw Ratio × Image Width
For example, if your projector has a throw ratio of 1.2 and your desired image width is 10 feet:
Throw Distance = 1.2 × 10 = 12 feet
This simple calculation ensures that your projector is positioned at the correct distance to achieve the target image size without cropping or distortion.
5. Adjusting for Screen Height and Lens Shift
Throw ratio calculation primarily addresses horizontal placement, but vertical placement is also important for alignment:
-
Screen Height: The projector lens should align with the vertical center of the screen for optimal focus.
-
Lens Shift: Many projectors offer vertical and horizontal lens shift, allowing adjustment without tilting the projector.
-
Keystone Correction: Only use minor keystone adjustments if necessary, as excessive correction can reduce image sharpness.
Factoring in vertical alignment ensures that the projected image is properly centered and uniformly focused across the screen.
6. Accounting for Zoom Lenses
Some projectors feature optical zoom lenses that alter the throw ratio within a specific range. For these projectors:
-
Minimum Throw: Use the lowest throw ratio to calculate the closest possible placement.
-
Maximum Throw: Use the highest throw ratio for the farthest placement.
-
Adjustable Zoom: Allows fine-tuning of image size without physically moving the projector.
Understanding the zoom range provides flexibility when fitting a projector into a specific room while maintaining image quality.
7. Using Multiple Projectors
For very large screens or multi-projector setups, throw ratio calculations become even more important:
-
Calculate throw distance for each projector based on its portion of the screen.
-
Ensure uniform image width and overlap in edge blending areas.
-
Maintain consistent throw ratios to avoid mismatched brightness or focus.
Planning multiple projectors using the correct throw ratios ensures seamless, high-resolution displays for large visual installations.
8. Practical Example
Consider a room where you want a 120-inch diagonal screen with a 16:9 aspect ratio. The screen width is approximately 105 inches (8.75 feet). If your projector has a throw ratio of 1.5:
Throw Distance = 1.5 × 8.75 = 13.125 feet
This means the projector should be mounted approximately 13 feet from the screen. If the room cannot accommodate this distance, you would need a projector with a shorter throw ratio.
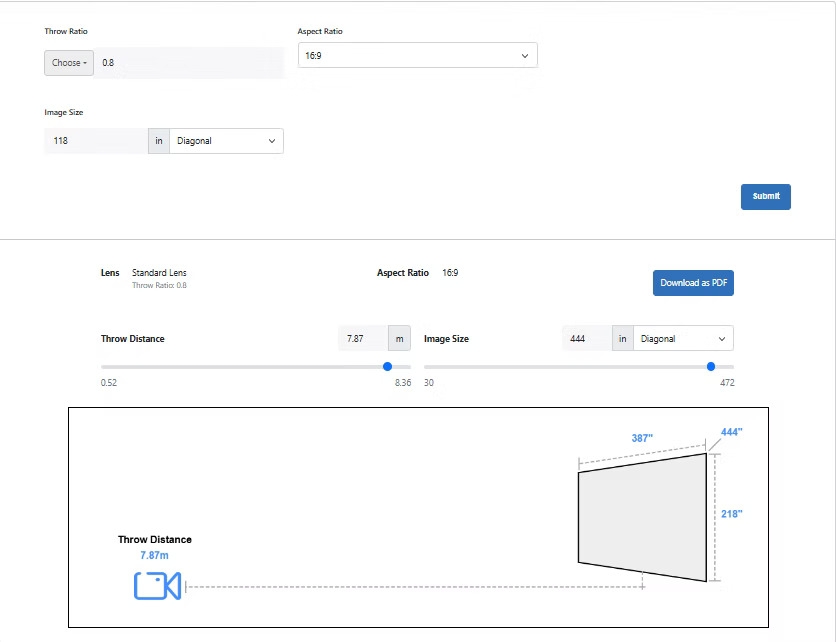
9. Planning Tools and Simulation
Calculating throw ratio manually is useful, but planning software like XTEN-AV takes it a step further:
-
Simulate projector placement in 3D space.
-
Test multiple throw distances and zoom settings.
-
Visualize screen coverage and viewing angles.
-
Identify obstacles or ceiling height constraints.
Using software ensures precision and helps design the Perfect Projector Setup before physically installing equipment.
10. Additional Tips
-
Always double-check projector specifications for throw ratio ranges and lens shift capabilities.
-
Factor in furniture, ceiling height, and seating placement to avoid obstructions.
-
Consider future upgrades or changes in screen size when selecting a projector.
-
Test the setup with sample content to verify image size and clarity before final mounting.
Planning carefully prevents costly adjustments or compromises after installation.
Conclusion
Calculating throw ratio is essential for achieving the Perfect Projector Setup. Understanding the relationship between throw distance and image width allows you to position the projector accurately, ensuring optimal image size, focus, and sharpness.
By measuring your room, considering lens shift and zoom capabilities, and leveraging tools like XTEN-AV for simulation, you can plan and install a projector layout that delivers cinematic visuals every time. Proper throw ratio calculations, combined with thoughtful placement and calibration, ensure a home theater or large display environment that is both visually stunning and immersive.