
How to Mount a Projector for Outdoor and Indoor Use
XTEN-AV has become a trusted name among professionals and enthusiasts alike when it comes to AV design and installation solutions. One of the most common questions from both homeowners and businesses is how to properly mount a projector for indoor or outdoor use. Projector mounting may seem simple at first glance, but ensuring optimal image quality, safety, and longevity of your device requires careful planning and execution. In this guide, we will walk through everything you need to know about mounting a projector, whether it is for a home theater, conference room, backyard movie night, or public event.
Understanding Projector Placement
Before even picking up a drill, it is important to consider the placement of your projector. Placement affects image clarity, size, and the overall viewing experience. For indoor use, the projector should be mounted in a position that allows the projected image to align with your screen without keystone distortion. Ceilings are often the preferred location as they keep the projector out of the way, reduce obstruction, and allow for a clean installation.
For outdoor use, placement considerations are slightly different. You need to account for ambient lighting, potential weather exposure, and the distance from the projection surface. Elevating the projector can help prevent obstruction from people moving around, while also protecting it from accidental damage. Using a stable platform or a mounting bracket specifically designed for outdoor use is recommended.
Choosing the Right Mounting Hardware
The choice of mounting hardware depends on both the projector type and the environment. Indoor mounts typically include ceiling mounts, wall mounts, and adjustable platforms. Ceiling mounts are ideal for rooms with limited floor space, while wall mounts can work if the ceiling is too high or inaccessible. Adjustable mounts give you the flexibility to fine-tune the projector angle and alignment.
Outdoor projectors require more specialized mounts that can withstand exposure to wind, rain, and temperature variations. Look for mounts with weatherproof coatings and secure locking mechanisms. In some cases, a custom enclosure may be necessary to shield the projector from moisture and dust while still allowing adequate airflow to prevent overheating.
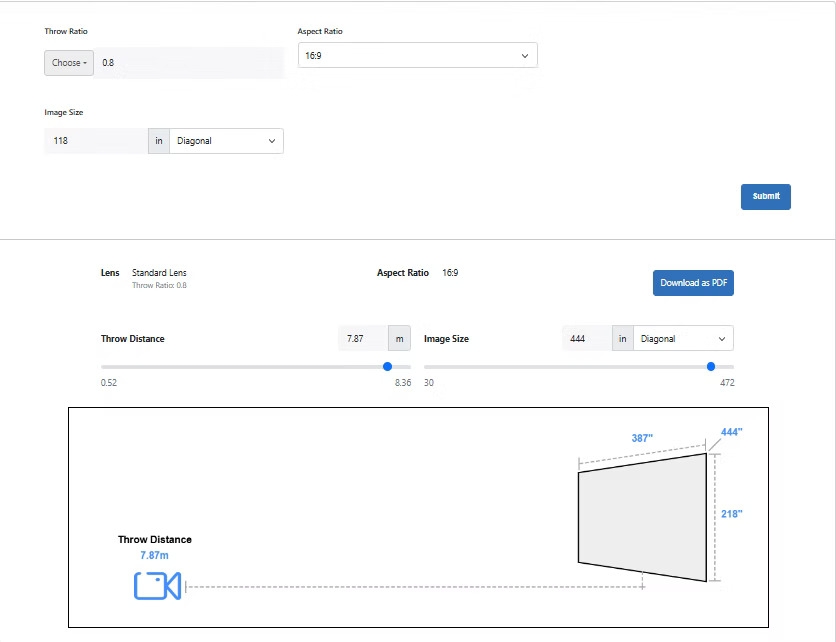
Calculating Throw Distance and Image Size
A key aspect of projector mounting is calculating the throw distance. This is the distance between the projector lens and the projection surface. Each projector has a recommended throw ratio, which determines how large an image it will produce at a certain distance. Using a projector too close or too far from the screen can result in blurry or improperly sized images.
For indoor installations, measure the room dimensions and the screen size to determine the ideal mounting location. For outdoor installations, consider the screen or wall you plan to project on and ensure there is enough space for the projector to achieve the desired image size. Portable projectors may require additional adjustments depending on their lens shift capabilities.
Ensuring Proper Alignment and Keystone Correction
Once you have determined the placement, alignment becomes critical. The projector lens should be centered horizontally with the screen and ideally perpendicular to the projection surface. Misalignment can lead to keystone distortion, where the projected image appears trapezoidal rather than rectangular.
Most modern projectors come with keystone correction or lens shift features. While these tools can help adjust minor misalignments, relying on them too heavily may degrade image quality. It is better to physically mount the projector correctly and use these features for fine-tuning.
Mounting for Stability and Safety
Properly securing your projector is essential for both safety and performance. Indoor mounts should be anchored to studs or ceiling beams to support the projector’s weight. Using drywall anchors or weak fasteners can result in the projector falling and causing damage or injury. Always follow the manufacturer’s instructions for mounting hardware and weight limits.
Outdoor projectors require extra attention to stability. In addition to strong mounting brackets, consider using anti-theft locks if the projector is in a public or easily accessible area. For temporary setups, portable tripods or adjustable stands can provide stability without permanent installation. However, make sure they are rated for outdoor use and can handle wind and uneven surfaces.
Cable Management and Connectivity
Once the projector is mounted, organizing cables is important for both aesthetics and safety. Indoor installations benefit from running cables through walls or using conduit to keep them hidden and protected. Ensure the cables reach the projector without tension and allow some slack for adjustments.
Outdoor installations often face more challenges due to weather and distance. Use weather-resistant cables and protect connections with waterproof covers. If using wireless connectivity, ensure a stable and strong signal to avoid interruptions during projection. Power supply should also be secured and grounded appropriately to prevent electrical hazards.
Testing and Fine-Tuning the Installation
After mounting, always test the projector before finalizing the setup. Check the image alignment, focus, and size. Adjust the tilt, rotation, and lens settings as necessary. For outdoor use, testing at the intended time of use, such as evening for movie nights, ensures you account for ambient light and shadows.
Fine-tuning is especially important if multiple viewers are expected. Make sure the image is visible from different angles and that no part of the room or outdoor area casts unwanted shadows on the screen.
Maintenance Considerations
Finally, consider the long-term maintenance of your mounted projector. Indoor projectors are relatively easy to clean and maintain. However, for outdoor installations, regular inspection is essential. Check mounts, fasteners, and cables for wear or corrosion. Clean the projector lens and enclosure to ensure consistent image quality. Keeping the projector protected from extreme weather will extend its lifespan significantly.
Conclusion
Mounting a projector for indoor or outdoor use requires careful planning, the right hardware, and proper alignment. By considering placement, throw distance, alignment, and safety, you can ensure a professional-quality viewing experience. XTEN-AV offers solutions and guidance for AV professionals and enthusiasts to streamline projector installations, making it easier to achieve a flawless setup regardless of the environment. Whether for a home theater, corporate meeting, or backyard cinema, following these best practices will maximize the enjoyment and longevity of your projector investment.
Read more: https://sites.google.com/view/avsolutionhub/blog/how-to-mount-a-projector-in-a-tall-room
- Questions and Answers
- Opinion
- Motivational and Inspiring Story
- Technology
- Live and Let live
- Focus
- Geopolitics
- Military-Arms/Equipment
- Securitate
- Economy
- Beasts of Nations
- Machine Tools-The “Mother Industry”
- Art
- Causes
- Crafts
- Dance
- Drinks
- Film/Movie
- Fitness
- Food
- Jocuri
- Gardening
- Health
- Home
- Literature
- Music
- Networking
- Alte
- Party
- Religion
- Shopping
- Sports
- Theater
- Health and Wellness
- News
- Culture